Thursday, September 15, 2011

Napa Valley Open Studios 2011

Napa Valley Open Studios 2011  •  cover art by glass artist Ed Breed
The next two weekends, Napa Valley Open Studios artists (including me) open up their studios to visitors, sharing their work, talking about their processes, answering questions, and sometimes giving demonstrations. It's a wonderful time to learn about different artists and how they work.


You can download a catalog online at www.napavalleyopenstudios.org, and you can find out what demonstrations you might see here.

Jocelyn Audette painting on location (in the middle of a lake)

Here's a photo gallery of artists at work (our workplaces often look a little different than most people's!), at NVOS Photo Gallery, including my favorite of Jocelyn Audette painting in the middle of a lake.

If you come – between 11 and 5 on September 17-18 and 24-25 – I hope you'll drop by and visit me at Studio #9 in St. Helena. I'll be at Ed Breed's studio. Ed, this year's cover artist, will be giving glass blowing demonstrations during the day, too. You can find us at 1734 Scott Street in St. Helena – and you can download a map here. I hope I'll see you!

Wednesday, September 14, 2011

Underpainting with values – the art of grisaille


Diego Velasquez's portrait of Juan de Pareja, 1650

Grisaille (pronounced grizz-eye) painting – creating an underpainting with light and dark values, generally using white and black paint – was used by many old masters, including Diego Velasquez, also spelled Velazquez, whose portrait of Juan de Pareja you see above. The color is created by layers of thin glazes painted on top of an underpainting in white, black, and grays.

The method is ably explained and demonstrated in Free Art Lesson – James Sulkowski – Underpainting, a five-minute YouTube video.

Notice first how Sulkowski holds his brush – far enough back – and paints using his whole arm, not just his hand and wrist.

"The reason for this technique," he explains, speaking of the grisaille, "is to get more depth and luminosity." He also demonstrates, briefly, blending edges with a fan brush (yes, fan brushes are meant for blending, not for painting generic "foliage"). This is a wonderful demonstration of painting light and shadow on a form using darks and lights. Although he is using oil paints rather than acrylics, you can get a longer drying time with acrylics by either using a retarding or slow-drying medium, or by using Golden's Open Acrylics, which give you three to four days of blending time before the paint dries.


Painter James Sulkowski demonstrates the process of glazing over the grisaille

He continues demonstrating how glazes are used over the grisaille in Taking the Mystery Out of Glazing, a second five-minute video, showing how classical painters like Velasquez used this process to create paintings like the portrait of Juan de Pareja. He also demonstrates using a mahl stick on the painting's finest detail. If you are interested in classical realism, you definitely want to watch these two videos – they will definitely help you in your painting process.

You can also see James Sulkowski's work at his website www.jamessulkowski.com.


Monday, September 12, 2011

Notes on Plein Air painting

Anitra painting  •  class plein air painting field trip  •  photo © 2011 Karen Lynn Ingalls
If you're planning on being a part of the Calistoga Art Center's first plein air paintout (the entry fee is only $25 if you sign up by September 15th), you may want a few tips on painting en plein air (in the open air). So, for you – notes on plein air painting:


  • Make quick thumbnail sketches of your composition before you begin
  • Bring your camera to take photos – the light will change, and it will give you a record of what the scene looked like
  • Wear a hat to provide shade
  • Bring a mister bottle to keep your palette from drying out too quickly (if you're using acrylic paints – Open Acrylic paints give you more drying time, and work much better on a hot day)
  • In some places, mosquito repellant is advisable
  • Don't take too much gear along, especially if you have to carry it a ways from your car
Jennifer painting  •  class plein air painting field trip  •  photo © 2011 Karen Lynn Ingalls 
  • Be prepared for wind – you can tape your palette paper down and brace your easel
  • Although limiting your gear is good, an old ironing board makes a useful place to put your palette and water, if you are setting up close to your car
  • If you don't want people to talk to you, and you're in a busy area, ear plugs and a portable radio/iPod helps – even if you're not listening to it.
  • Most plein air painters work very small on location – perhaps 4" x 5", 8" x 10", or 9" x 12". This is because light and weather conditions can change so rapidly - it's easier to get everything down rapidly when you work small. Often, they will use those studies as the basis for larger paintings later. 
  • You can also return to the same scene at the same time a couple of days in a row, to catch similar light as you work on the same painting.
Victoria and Jennifer painting  •  class plein air painting field trip  •  photo © 2011 Karen Lynn Ingalls  

Monday, September 5, 2011

Calistoga Art Center Plein Air Paintout

Jim Hour painting at our Acrylic Painting class field trip at Judy's house, 2010
The Calistoga Art Center is planning its first plein air paintout – October 7–9, 2011.

(Its what?) The term "plein air," pronounced "plenn air,"is french for painting outdoors. "Painting en plein air" means painting in the open air. It's different from painting in the studio. You have the elements to think about (heat, wind, cold, rapidly changing light, inclement weather) and none of the comforts of the studio as you work. But you also have the great outdoors – you are right smack dab in the middle of the scene that's inspiring you.

Claude Monet painting in his garden, from short film, Impressionists Live, on YouTube
Plein air painting was difficult until the invention of tube paints in the 1870s – and the invention of the French easel, which allowed one to carry the easel off the beaten path and set up outdoors (the wooden easels you see in these photographs are French style easels). In France, the Barbizon School and the French Impressionists began what has become a painting tradition.

Diana, Sharon, and Anitra, painting in last week's Acrylic Painting class field trip
We're lucky that in California we have such good weather – so it may not surprise you to learn that California (the Bay Area, the Central Coast, and Southern California) has been a hotbed of plein air painting for over a hundred years.

Victoria painting in last week's Acrylic Painting class field trip
And with the beauty of the vineyards in the autumn, we'll have lots of beautiful spots to choose from for this paintout.

So what's a paintout?

A paintout is a competition and show (but for us, it also will be an excuse to get out into the vineyards and do some serious brushwork). You begin on Friday, and get your canvases, panels, or papers stamped on the back (that's to make sure you haven't gotten a head start). Then you have two days to paint, en plein air, and you turn your painting, or paintings, in on the second day. On the third day, everyone comes to the show, and you celebrate. Fun, eh?

Sharon painting in last weeks Acrylic Painting class field trip
Most well-known paintouts draw professional painters from all over the country, and participation is juried. But this is a first for Calistoga, so everyone who wants to be a part of it is welcome. Does it appeal to you? You can learn more at the Calistoga Art Center website. There's a $25 fee for participating if you sign up by September 15th – after that it's $35 – so sign up soon!


Tuesday, August 30, 2011

Painting Trees - IV

Craig Nelson demonstrates painting negative spaces in trees

More on painting trees! In class, I've particularly emphasized using the negative space to create the shapes of the trees. (Remember how we talked about "sky holes"?) Here's a YouTube video by Craig Nelson demonstrating that – Painting Negative Spaces in Trees and Foliage.

Craig Nelson using an "egbert," or long filbert, to paint foliage

He demonstrates using a particular kind of brush - an "egbert" – also called a long filbert. Notice how very long and slender the bristles are? It gives a delicacy and flexibility to the brush strokes that he is particularly looking for.

Nathanael Provis makes sure you never use a fan brush again

And if I haven't already discouraged you from using a fan brush to create generic-looking foliage, here's an artist who may help you see the light... See Art Disasters 3: How to Paint Trees - artist Nathanael Provis. Be sure to watch all the way to the end - you don't want to miss his rant on fan brushes. (Note: he is using oil paints, which dry much more slowly than acrylics.)

Tuesday, August 23, 2011

Soft Block Printing workshop - Saturday

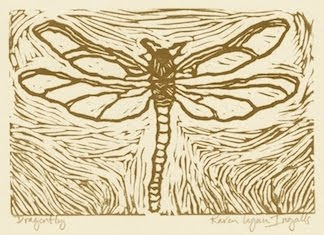
Dragonfly soft block print • © 2003 Karen Lynn Ingalls

Have you been intrigued by the possibilities of block printing? (If not, I hope you will be... it is a wonderful art form to work with.) Or do you like stamping, and feel like getting more creative?

Iridescence, an acrylic painting created using the same dragonfly soft block
© 2010 Karen Lynn Ingalls

Block printing is kind of a next step up from stamping – and you can combine it with acrylic painting to create mixed media pieces, something I particularly enjoy (you can see it in the painting above, Iridescence). You can also use it to print on textiles – but it stands on its own as a wonderful medium.

Angel of Peace soft block print, printed as a holiday card
© 2003 Karen Lynn Ingalls

You can use it to create handprinted cards and fine art prints, which is what we'll be doing this Saturday in this year's Soft Block Printing workshop. Soft block printing is similar to, but much easier to work with, than linoleum block or wood block printing. We'll also be using non-toxic, water-soluble inks, as well as safety cutters, which have the added benefit of allowing you more control of your cuts, and giving you the ability to cut much nicer curves.

In the workshop, we'll design and cut the block for printing, and ink and print greeting cards and fine art prints. If you'd like to come, bring along some images you might like to make prints of – drawings? photographs? We'll be carving 4" x 6" blocks.

Songbird soft block prints drying, in process, with multiple colors
© 2010 Karen Lynn Ingalls

The workshop runs from 10:00 a.m. to 5 p.m. on Saturday, August 27th, at the Calistoga Art Center, 1435 North Oak Street in Calistoga (at the Napa County Fairgrounds). Bring your lunch! You can register online at the Calistoga art center's website, at www.calistogaartcenter.org.

You can also see photographs of the process from 2010's two-day printmaking workshop in my August 2010 blog post. And here's a link to Charles deLimur's block printing process, a marvelous block printing photo essay by Charles deLimur, a Calistoga artist who does Napa Valley Open Studios each year. Charley works with multiple colors and multiple printing runs, a difficult and challenging process, which he illustrates beautifully. If you click on each individual photo, you can read his commentary about the process.

If you'd like to come, I look forward to seeing you! And if you're not able to join us, think about the possibilities of block printing... it's really a wonderful medium.

Wednesday, August 17, 2011

Painting Trees - III


Landscape painter Jan Schmuckal takes yet another approach to painting landscapes – and painting trees, but one that also pays close attention to negative spaces. In this time-lapse demonstration video, Painting Demo, which you can find on YouTube, she begins by toning the entire canvas in a deep brown wash.


Next, she removes paint with a Q-tip, creating the basic lines of her composition. While she uses oil paints, which don't dry as quickly as acrylics, Open Acrylics, which have a longer drying time, would allow you to try this method using acrylics.


Next, she removes the color in areas that are going to be light – in this case, the sky and the sky's reflection in the water below – in other words, in the negative spaces. She defines the trees by removing anything that isn't tree....


Notice how she removes paint inside the tree, for the spaces where the light shows through? (Napa Valley painter Vicki Long calls them "sky holes.")


Once the shapes of her composition are established, Schmuckal then comes in with a brush and paint, bringing color and increased light into the dark areas.


Next she further defines the trees by painting the negative spaces around them – the sky, and its light.


Once the light in the sky is established, she returns to the trees, bringing lighter values to the leaves and branches. Throughout, however, she keeps the shapes simple – the details she adds never detract from whole. There is no element of fussiness here – there is, instead a wonderful sense of place, of light and dark, of atmosphere....


And here is the final painting!

You can see the complete video at Painting Demo on YouTube, and you can see more of Jan's paintings on her gallery website (Gallery 28 in Geneva, Illinois). You can also follow Jan at her Facebook page, Jan Schmuckal Tonalist Impressionist Artist. You can also buy her paintings on eBay, at Gallery 28 Originals Jan Schmuckal. I hope you'll follow the links through to discover more of her work – it will be well worth your time.


Saturday, August 13, 2011

Painting Trees - II

The final painting - Changing the Light, by Robert Genn

It is a joy to watch the landscape painting process of Robert Genn, a British Columbia artist who works in acrylics. Luckily for us, he has filmed the process of creating several paintings, and shared the results on YouTube.

Robert Genn begins painting what will become Changing the Light

Changing the Light begins with Genn working on location on the shores of a lake. He begins to sketch the basic structures of his composition. Unlike me, he does not step back and turn his canvas upside down to check the composition (it's still a good idea!), nor does he begin with a thumbnail. However, he has been working en plein air so long that he no longer needs what is pretty useful to many of us.

Developing the painting

Notice that he is working on a toned canvas? In this case, it is toned a mid-gray. You can tone your canvas any color you like, if you want to try this – it is one way of pulling the colors together and harmonizing them.

Covering the painting with a wash

Genn then wipes a wash over the entire painting – another method of harmonizing the colors.

Changing the light... a good reason for the title!

Now the magic happens, when he brings sunset light into the sky (changing the light). Notice how he paints the negative spaces around the tree branches?

You can watch the video online at Changing the Light. Robert Genn's username is painterskeys, and you can also watch his other videos. To study the painting of trees, I especially recommend Forest Spirit and Cuckoo. You'll enjoy his studios-on-wheels, too.

You can see more of his paintings, and learn more about him, at www.RobertGenn.com.

Genn also writes a thoughtful, perceptive newsletters, with thousands of subscribers. Each week he writes two letters, and then posts some of the responses on his website. You can read them – and subscribe – at www.painterskeys.com. I've been subscribing for over ten years now, and I always learn something new. I heartily recommend it.

Wednesday, August 10, 2011

Painting Trees - I

Image from Sheldon Borenstein's instruction video on How to Paint Trees

For my students who are working on painting trees, here's a great video resource online.

Sheldon Borenstein demonstrates how to paint an oak tree, a palm tree, and a group of trees, in his Youtube video How to Paint Trees.

Image from Sheldon Borenstein's instruction video on How to Paint Branches

He develops it a little further in How to Paint Branches. They're short, succinct lessons that I think you'd find helpful.

Alfredo Tofanelli's painting Light Play,
and his show at the Napa Valley Museum Spotlight Gallery
through the end of September

Also - THIS Saturday, Alfredo Tofanelli will be teaching a painting workshop at the Napa Valley Museum. Tofanelli is a wonderful landscape painter who works with the methods and palette of Henry Hensche, whose work you can see here.

Henry Hensche's landscape painting Ada and Wags

If this palette looks familiar to you, then you may have seen the paintings of Camille Przwodek, a well-known student of Henry Hensche, who lives and works in Petaluma, California, and with whom Tofanelli studied. It's a four-hour workshop for $60, and should be well worth it. Reservations are required, so give the museum a call at (707) 944-0500.

Thursday, July 21, 2011

Making lines with Robert Joyner


Virginia painter Robert Joyner demonstrates three ways of creating lines in this YouTube video, Acrylic painting tutorial. Brushwork Part 1.

First, he demonstrated using a liner brush, a very long, slender brush beloved by signpainters.


Next, he demonstrates sgraffito – the technique of scratching lines into the paint and letting the paint color underneath show through. He shows how to do this first with a palette knife, and second with the end of the handle of your paint brush.


Joyner's style is very loose and painterly, with thick layers of paint laid on lovingly. It's fun to watch him lay down the paint, and cut back into it to create lines. You can see his work at http://www.robertjoynerartist.com/.

Monday, July 18, 2011

Painting demonstration follow-up

My Calistoga • © 2011 Karen Lynn Ingalls

Wondering how that demonstration painting turned out? You can see the results (so far – it's not completely finished yet) above, and I posted the process here:


You can see lots of scumbling and tinted collage elements, and get some ideas about combining collage and painted elements in an art piece.

If the collage elements intrigue you, I teach them in my Painting Collages workshop, which is coming up this Saturday, July 23rd, at the Calistoga Art Center. You can find more information at www.NapaValleyArtWorkshops.com/painting-collages1.html.


Monday, June 27, 2011

Painting demonstration at the Napa County Fair


I'll be giving painting demonstrations this Saturday and Sunday, July 2nd and 3rd, at the Napa County Fair. From 5 to 8 p.m. on both days, I'll be at the Calistoga Art Center, which is a part of the fair for the first time.

I'm still debating as to what I'll be painting... maybe landscape painting one day, maybe mixed media the next? Come by, and be surprised! (I hope in a good way.)

Friday, June 24, 2011

Another little review

Remember focal point?

No? Here's a review of my posts on focal points to date.... If it's new to you, start at the bottom and work your way up. Understanding how focal points work is essential in the process of painting, if you want to create paintings that work (in abstract work, too).

Monday, June 20, 2011

A little review...


Here's a collection of some of the posts I've written on different painting topics over the course of this blog. If you want to learn - or refresh your memory - about how to start a painting, you'll find some good information here.

Click here for posts on Thumbnail sketches

Click here for posts on Blocking in a painting

Click here for posts on Negative space

Happy painting!

By the way, my next Painting Landscapes workshop is this Saturday, June 25th, at the Calistoga Art Center, in Calistoga, California. It's the only time I'll be teaching it this year. You can learn more about it here at my workshops website, NapaValleyArtWorkshops.com.

Monday, April 25, 2011

Jackson Pollock dancing with the brush

Hans Namuth's photograph of Jackson Pollock at work

Inspired by Jonas Gerard's dancing to paint? (If you haven't been introduced to Jonas Gerard yet, see my post from December 7, 2009, Dancing with the brush.) We are lucky to have film of Jackson Pollock painting, too – see examples at Jackson Pollock 51, which you can see on YouTube.com. Although he did not paint with the same sense of joy you can see in Jonas Gerard at work, he worked spontaneously, dancing with the brush (or stick) and paint.

Ed Harris, from his film Pollock

The scenes of Ed Harris as Pollock, painting in the film Pollock, are wonderful to watch, too. Here is a scene on Youtube.com – the clip is called Jackson Pollock dancing colors – he is painting his first monumentally large piece, after having torn out the walls of his studio in order to fit the canvas. Harris gives the viewer a good sense of the visceral, subconscious, dancing quality of the act of painting as Pollock practiced it.

It makes me want to get out a very big canvas, and dance....

Monday, March 21, 2011

Spring 2011 painting class schedule

Just-Spring • © 2010 Karen Lynn Ingalls

We're into the second week of the March/April session already (remember, no class this Friday) – and here's the class schedule for the rest of this spring:

April/May: (Note the week off for spring break!)

Wednesdays: April 13, spring break, 27, May 4, 11

Fridays: April 15, spring break, 29, May 6, 13

May/June:

Wednesdays: May 18, 25, June 1, June 8

Fridays: May 20, 27, June 3, 10

Location:
The new Calistoga Art Center,
Napa County Fairgrounds, Cropp Building,
1435 North Oak Street, Calistoga, California

Wednesday, March 9, 2011

Remember scumbling?

Three Palms for Gail • © 2011 Karen Lynn Ingalls

Scumbling (sounds like stumbling, but with a "k" sound) is, for me, one of the most useful techniques an artist can learn. I've used it in several places throughout the painting above. It's a particular kind of brushwork – using it, you can create wonderfully magical effects. To scumble, you drag a dry brush lightly loaded with paint across another color.
Detail, Three Palms for Gail • © 2011 Karen Lynn Ingalls

When might you use it? Anytime you want a transitional area between colors (in portraits, in landscape paintings, in painting skies, for example). Above, it not only helped create an atmospheric effect in the skies and distant mountains, but it also added a kind of laciness to the palm fronds. Scumbling is a way of blending color that allows the viewer to blend the colors with their eyes....

Want to learn more? Here are two earlier posts that discuss it thoroughly:

Scumbling shows how scumbling was used by Rembrandt and Modigliani in portraits.

Scumbling video lesson with Jan Blencowe links to a demonstration of the scumbling technique that Blencowe uses to create a beautifully atmospheric sky.